Setting up R Studio Server on Google Compute Engine
For many data scientists, R is a must-have tool for running all kinds of data analyses. And many of them would prefer to use R Studio Server to take advantage of server-level machine specifications (e.g. access more RAM memory than a desktop computer would provide) and allow for collaboration with colleagues and peers.
The good people at rocker-org can help you get up and running with R Studio Server using a Docker container. But if you want to setup R Studio Server from scratch on Google Compute Engine, then you can follow this guide.
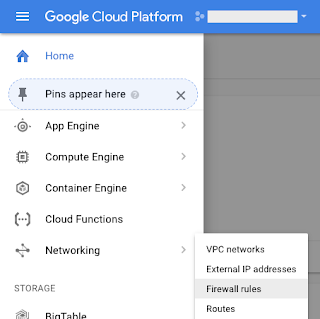
1. Go to Menu > Networking > Firewall rules
2. Create a firewall rule.
3. Configure the following settings:

4. Press "Create" to save your rule.
Now, you can create your VM instance to actually run R Studio Server.
1. Go to Menu > Compute Engine > VM instances
(If you see a dialog box with a short description of VM instances, press "OK" and continue).

2. Create a new instance.
3. Give it a name. For this tutorial, I'll use "rstudio".
4. Choose a Zone that's closest to where you operate from. This reduces network latency when working with your R Studio Server. In my case, I'll use "asia-southeast1-a".
5. Give your instance as much memory as you can afford. R stores all of its working datasets in memory. So the more memory that you allocate, the more or larger datasets that you can work with in R Studio Server.
6a. Under "Boot Disk", click "Change".
6b. Under "OS images", choose the latest version of Ubuntu that supports OpenSSL 1.0. As of this tutorial, R Studio Server can only be installed on a server that has OpenSSL 1.0. So the latest Ubuntu version that supports that is Ubuntu 17.04.

7. Under Firewall, select "Allow HTTP traffic". R Studio Server connects through an unsecured HTTP connection.
8a. Click on "Management, disks, networking, SSH keys" to expand that section.
8b. Under "Networking", under "Network tags", enter "rstudio". This is the Target tag of the Firewall rule that you had created earlier.

9. Click "Create" to create your instance.
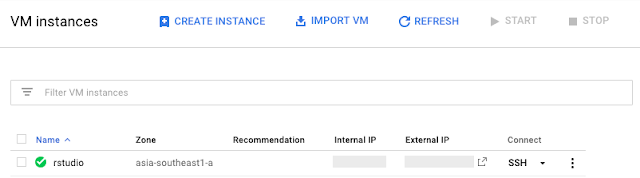
Google Cloud will take a while to create your new instance. Once it's done, you'll a green check mark next to it in your list of VM instances.
1. In your Google Compute Engine VM instances window, click on "SSH" next to your new instance. This will open a new window in your browser. Once the connection is ready, you'll be at the command prompt.

2. Update apt to make sure you have the latest packages to use with Ubuntu.
3. Install R, the language.
To do so, you will need to use the SSH terminal window that you had opened previously. If you had closed it, follow step 1 under "2. Install R Studio Server", then continue here.
In this example, I have two requirements:
1. Create a "datascientists" group. This will make it easier to manage shared folders and files.
4a. I'll start with Brenda.
After completing all of the above steps, you can close the SSH terminal window.
For example, if your External IP is 35.185.161.49, then your R Studio Server URL is:

References:
The good people at rocker-org can help you get up and running with R Studio Server using a Docker container. But if you want to setup R Studio Server from scratch on Google Compute Engine, then you can follow this guide.
Recipe to run R Studio Server on Google Compute Engine (with screenshots)
- Set up a Compute Engine VM instance in Google Cloud.
- Install R Studio Server.
- Create users and groups.
1. Set up a Compute Engine VM instance in Google Cloud
Actually, before setting up the VM instance, you should configure your Firewall rule first. R Studio Server uses server port 8787 by default, so you should make sure that port 8787 is open to allow for network connections.1. Go to Menu > Networking > Firewall rules

2. Create a firewall rule.
3. Configure the following settings:
- Name: rstudio
- Description: Allow network connections to port 8787 for R Studio Server
- Network: default
- Priority: 1000
- Direction of traffic: Ingress
- Action on match: Allow
- Targets: Specified target tags
- Target tags: rstudio
- Source filter: IP ranges
- Source IP ranges: 0.0.0.0/0
- Second source filter: None
- Protocols and ports: Specified protocols and ports
tcp:8787
4. Press "Create" to save your rule.
Now, you can create your VM instance to actually run R Studio Server.
1. Go to Menu > Compute Engine > VM instances
(If you see a dialog box with a short description of VM instances, press "OK" and continue).

2. Create a new instance.
3. Give it a name. For this tutorial, I'll use "rstudio".
4. Choose a Zone that's closest to where you operate from. This reduces network latency when working with your R Studio Server. In my case, I'll use "asia-southeast1-a".
5. Give your instance as much memory as you can afford. R stores all of its working datasets in memory. So the more memory that you allocate, the more or larger datasets that you can work with in R Studio Server.
6a. Under "Boot Disk", click "Change".
6b. Under "OS images", choose the latest version of Ubuntu that supports OpenSSL 1.0. As of this tutorial, R Studio Server can only be installed on a server that has OpenSSL 1.0. So the latest Ubuntu version that supports that is Ubuntu 17.04.
7. Under Firewall, select "Allow HTTP traffic". R Studio Server connects through an unsecured HTTP connection.
8a. Click on "Management, disks, networking, SSH keys" to expand that section.
8b. Under "Networking", under "Network tags", enter "rstudio". This is the Target tag of the Firewall rule that you had created earlier.
9. Click "Create" to create your instance.
Google Cloud will take a while to create your new instance. Once it's done, you'll a green check mark next to it in your list of VM instances.

2. Install R Studio Server
The next few steps require running commands through a SSH connection. You can copy-and-paste the specified commands in your SSH terminal at each step.1. In your Google Compute Engine VM instances window, click on "SSH" next to your new instance. This will open a new window in your browser. Once the connection is ready, you'll be at the command prompt.
2. Update apt to make sure you have the latest packages to use with Ubuntu.
sudo apt-get update
sudo apt-get upgrade
3. Install R, the language.
sudo apt-get install r-base r-base-dev4. Install R Studio Server. As of this tutorial, the latest version is R Studio Server 1.0.153. You can find out the latest version of R Studio Server at the official download page.
sudo apt-get install gdebi-core5. Install supporting packages. These are usually required to install R packages inside R Studio Server.
wget https://download2.rstudio.org/rstudio-server-1.0.153-amd64.deb
sudo gdebi rstudio-server-1.0.153-amd64.deb
sudo apt-get install libcurl4-openssl-dev libssl-dev libxml2-dev
3. Create users and groups
Recall that one of the important reasons for using R Studio Server is to collaborate with your colleagues and peers. So you should add users to your VM instance so that other people can work with your R Studio Server.To do so, you will need to use the SSH terminal window that you had opened previously. If you had closed it, follow step 1 under "2. Install R Studio Server", then continue here.
In this example, I have two requirements:
- I want to add two users: Brenda and Daniel.
- I want all users to be able to share a folder that I own.
- The convention is to use lowercase for the usernames.
- You will be prompted for a password. Enter one – and make sure your user knows it!
- You can leave the other fields empty.
1. Create a "datascientists" group. This will make it easier to manage shared folders and files.
sudo addgroup datascientists2. Create a master user. The idea here is that while colleagues and peers will join or leave you, your "master user" should remain to own all shared files.
sudo adduser master3. Create the shared folder.
cd /home/master4. Add users.
sudo mkdir shared_folder
sudo chown -R master:datascientists shared_folder/
sudo chmod -R 770 shared_folder/
4a. I'll start with Brenda.
sudo adduser brenda4b. Add Brenda to the "datascientists" group.
sudo gpasswd -a brenda datascientists4c. Link the master user's shared folder to Brenda's home folder. To do so, you'll need to "login" as her. That's what the first of the next three lines does. So you need to remember to exit as her at the last of the three lines.
sudo usermod -g analysts brenda
su - brenda4d. Repeat step 4a-4c for Daniel, i.e. replace "brenda" with "daniel".
ln -s /home/master/shared_folder /home/brenda/shared_folder
exit
After completing all of the above steps, you can close the SSH terminal window.
Start using R Studio Server!
Back in the VM instances list, take note of the External IP of your R Studio Server instance. Then in your browser, open R Studio Server with the following URL:http://[External IP]:8787
For example, if your External IP is 35.185.161.49, then your R Studio Server URL is:
http://35.185.161.49:8787Login as "master" or any of the users that you had created earlier. After doing so, you should see the familiar R Studio Server graphical user interface. And in your folder list, you can see the shared folder.

References:

Does not work
ReplyDeleteNot working for me. It loads R Studio Server into the instance, but then when I try to launch the external IP address, it doesn't connect.
ReplyDelete